
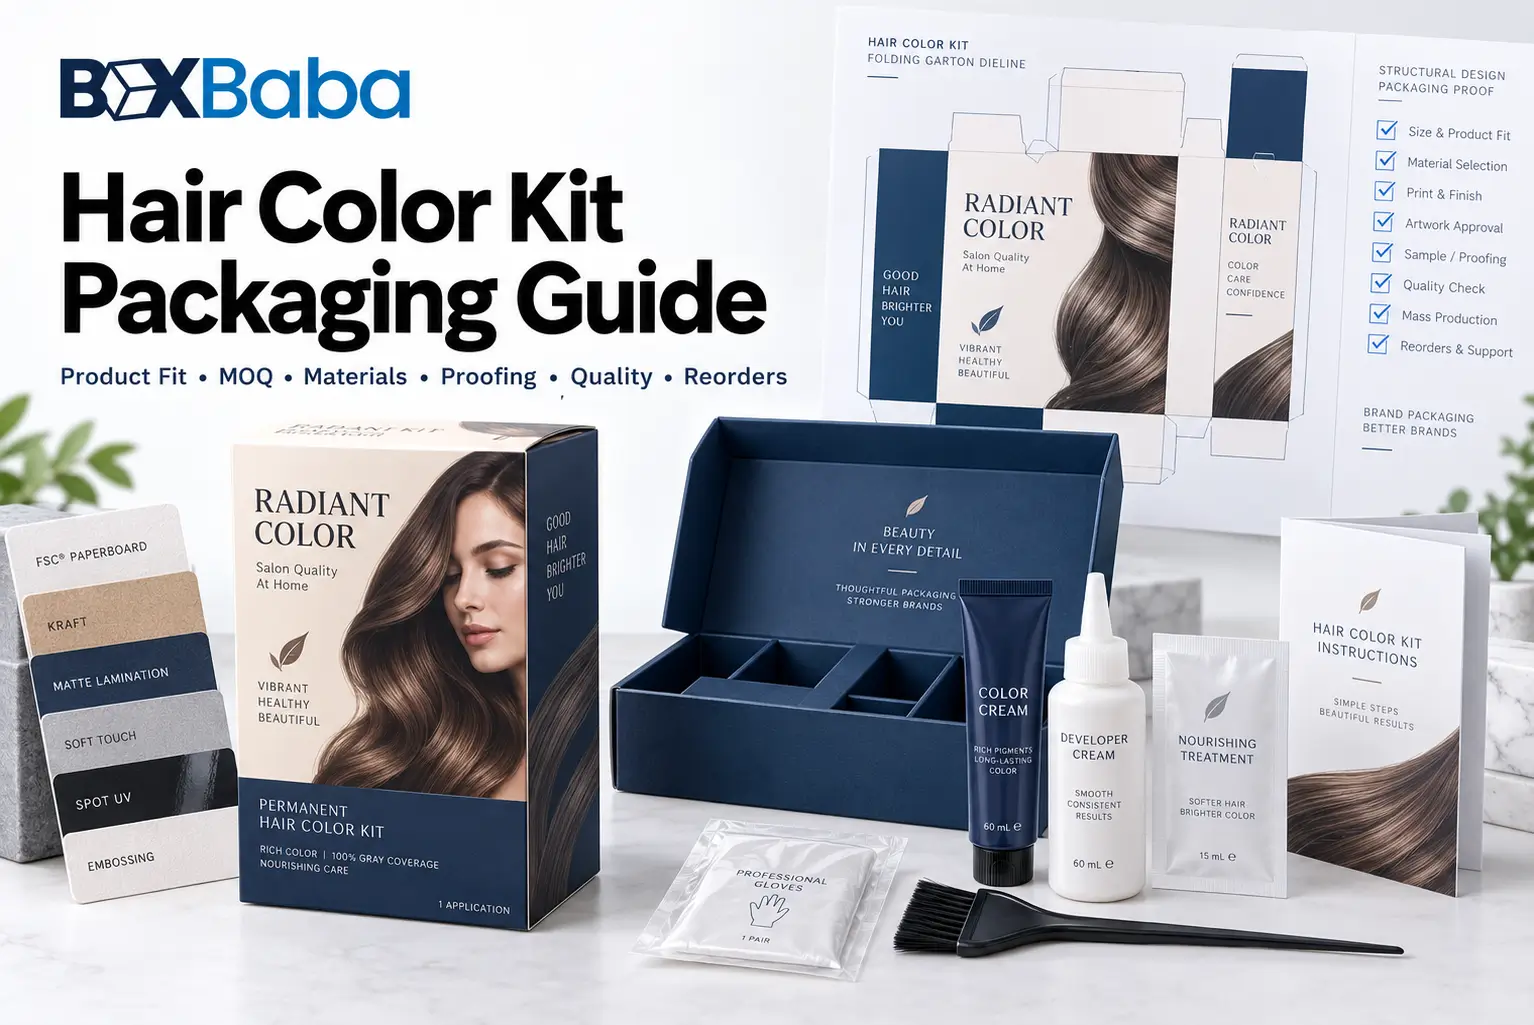
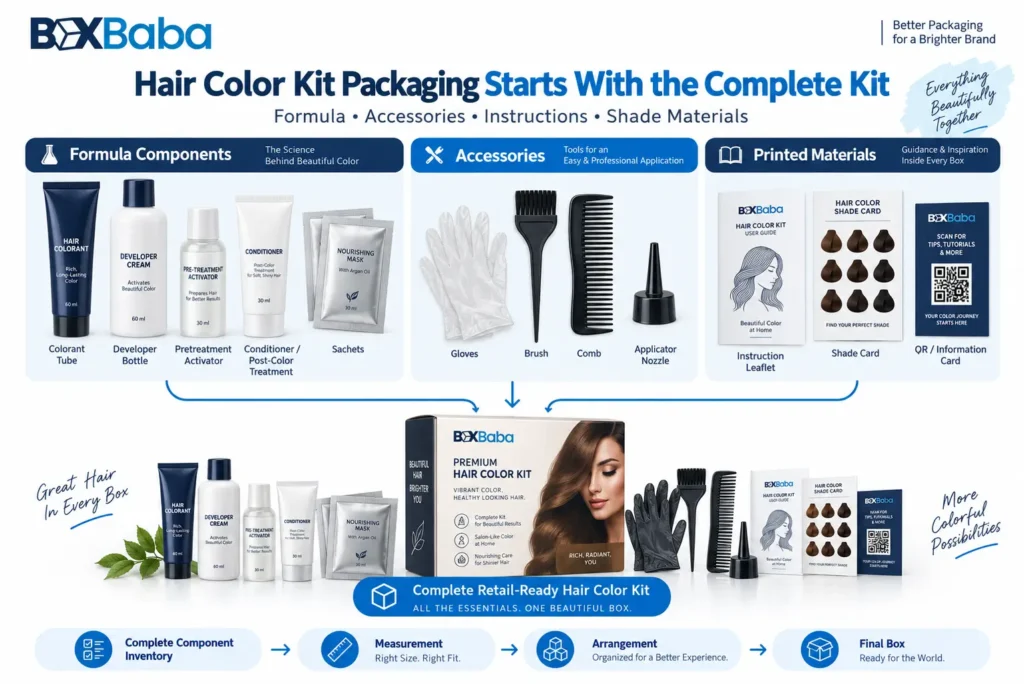
Hair color packaging should be planned around the complete retail-ready kit, not only the colorant tube or developer bottle. A typical at-home dye kit can contain several formula containers, accessories and printed instructions, and each component changes the internal layout, loaded weight and final carton requirements.
Two kits sold under the same brand can therefore need different packaging even when the shade name is the only obvious difference to the shopper. A change in developer bottle, tube size, treatment sachet, applicator or instruction format can change the physical package.
Use this sequence: Complete Kit Inventory -> Measure Every Finished Component -> Confirm Component Order + Orientation -> Total Loaded Layout -> Direct Fit / Divider / Insert Decision -> Internal Carton Dimensions -> Material + Structure -> External Dimensions -> Dieline -> Artwork
Brands preparing a custom project can review Hair Color Packaging. For the measurement principles used across cosmetic tubes, bottles, jars and other containers, see the Cosmetic Box Size Guide.
What Counts as a Hair Color Kit?
A hair color kit can be a single professional color tube or a multi-component consumer application system. The packaging task changes according to the actual product configuration.
Kit Format | Typical Components to Confirm | Main Packaging Question |
|---|---|---|
Individual color tube | Filled tube, cap, crimp, seal, label | Does one fitted carton cover the complete tube? |
Tube + developer kit | Colorant tube, developer bottle, leaflet, gloves, treatment | How should dissimilar shapes share one carton? |
At-home dye kit | Colorant, developer, gloves, applicator, conditioner/treatment, instructions | What arrangement supports packing, opening and identification? |
Root-touch-up kit | Colorant, activator, brush/applicator, gloves, leaflet | How should narrow accessories and formula containers be organized? |
Multi-step color system | Colorant, developer, pretreatment, post-treatment, gloves, instructions | How should steps be ordered and separated? |
Professional salon system | Individual tubes, developer products, shade identification | Does the project use unit cartons, coordinated sets or wholesale packs? |
Launch / promotional kit | Products, shade card, campaign material, accessories | Is presentation sequencing part of the package? |
There Is No Universal Hair Dye Kit Box Size
A shade name, net contents or total kit count does not establish a production-ready box size. The dimensions depend on the complete finished components and how they are arranged together.
Hair Color Shade != Component Geometry != Completed Kit Dimensions != Finished Box Dimensions.
Published standard sizes can be useful for rough planning only. Final secondary packaging should be developed from the actual components or approved production-equivalent dimensions.
Start With a Complete Component Inventory
Before measuring the box, list everything the customer will receive inside the retail package. The component inventory should include formula containers, accessories and printed materials rather than only the main product.
- Colorant tube or bottle
- Developer bottle or activator
- Pretreatment or barrier product
- Conditioner or post-color treatment
- Sachets or pouches
- Gloves or glove pouch
- Applicator bottle, nozzle, brush or comb
- Instruction leaflet
- Shade card or information card
- Coupon, insert card or QR instruction card
- Any sample, accessory or promotional item
The completed component list becomes the basis for measurement, arrangement, insert planning, artwork versioning and quotation.
Measure Every Component in Its Finished Retail Condition
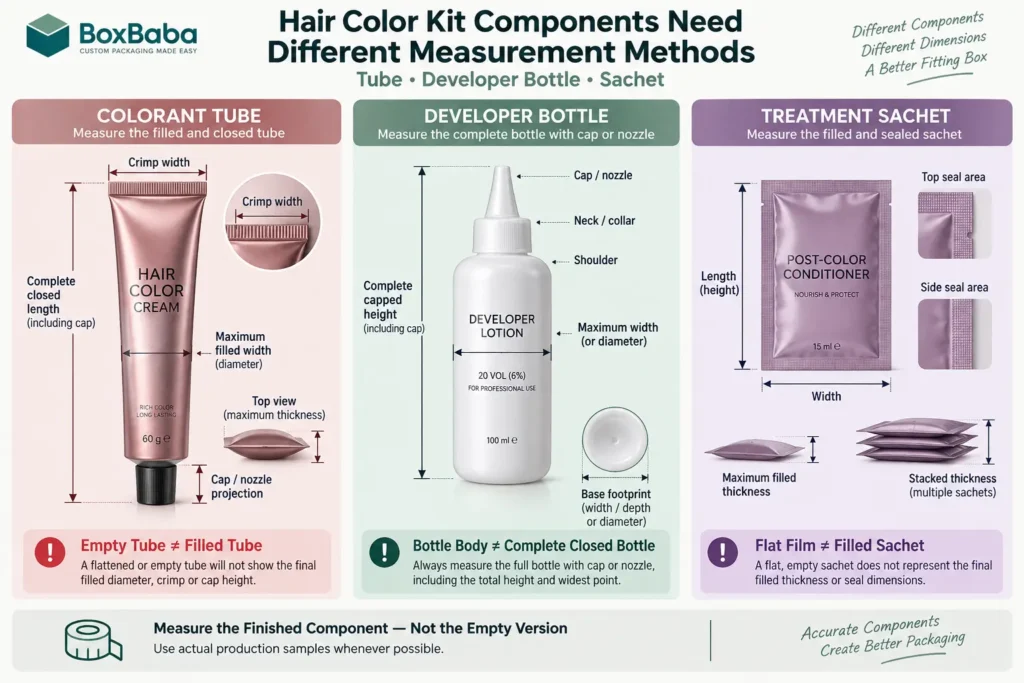
Measure each tube, bottle, sachet and accessory after it has been filled, closed, labeled and assembled as it will enter the box. Empty or flattened samples can understate the final profile.
Component | Measurements to Record | Common Missed Detail |
|---|---|---|
Colorant tube | Closed length, max width, filled thickness, crimp width, cap/nozzle size | Empty tube is flatter than filled tube |
Developer bottle | Complete capped height, max W/D or diameter, shoulder, neck, cap/nozzle, base | Closure can be wider than bottle body |
Treatment sachet | Flat L x W, filled thickness, seal profile, count, stacked thickness | Multiple sachets create cumulative thickness |
Glove pouch | Folded L x W x thickness, pair count | Loose gloves and sealed glove pouches pack differently |
Applicator / brush | Overall L x max W x max D | Handle or nozzle may project |
Leaflet | Final folded L x W x thickness | Fold style and page count change thickness |
Shade card / insert card | Finished L x W x thickness | Card stock and folds add volume |
How to Measure the Colorant Tube
Measure the completely filled and capped colorant tube. Record total closed length, maximum body width, maximum filled thickness, crimp width, cap dimensions, shoulder profile and any nozzle or seal projection.
Do not use only the printed fill amount or empty flat-tube width. A filled tube can become thicker, and the crimp or cap can create a larger maximum dimension than the main body.
Use: Complete Closed Tube -> Maximum Width -> Maximum Filled Thickness -> Crimp + Cap Profile.
How to Measure the Developer Bottle
Measure the developer bottle as a complete filled and closed unit. Record complete capped height, maximum width and depth or maximum diameter, shoulder profile, neck/collar, cap or nozzle dimensions and base footprint.
If the cap or applicator nozzle extends beyond the bottle body, the closure becomes part of the maximum product envelope.
Also record the filled bottle weight because the developer can be one of the heavier components in the kit.
How to Measure Sachets and Multi-Step Treatment Packs
Sachets should be measured as filled sealed packs rather than flat packaging film. Record flat length and width, maximum filled thickness, seal areas and the number of sachets used in the final kit.
When several sachets are stacked, measure the combined stack rather than multiplying nominal film thickness. Filled product distribution and seals can change the stack profile.
Treatment packets can be positioned beside formula containers, under a tray or behind a leaflet, so their final location should be decided before the internal box is locked.
How to Measure Gloves
Gloves may be loose-folded, paired, banded or sealed inside a pouch. Measure them in the exact condition used for packing.
Record folded length, folded width, maximum compressed or packed thickness, number of pairs and any glove pouch dimensions. Do not assume every pair compresses to the same thickness.
Applicators, Brushes and Nozzles Need Their Own Space
Root-touch-up and multi-step kits may include brushes, combs, mixing nozzles or application bottles. Measure each accessory as a separate physical entity.
Long narrow accessories can create unused space if they are placed beside shorter containers, so confirm whether they sit horizontally, vertically or inside a dedicated rail or compartment.
Instruction Leaflets Can Change the Internal Layout
Instructions are not only an artwork issue. The final folded leaflet has physical dimensions and thickness. A long multi-language leaflet can require more internal space than a short single-language instruction sheet.
Record the final folded width, height, thickness, fold pattern and intended position inside the kit.
If different markets require different leaflet lengths or folds, treat those versions as potential packaging variations and confirm whether one structural layout can still accommodate them.
Component Order Is a Structural Decision
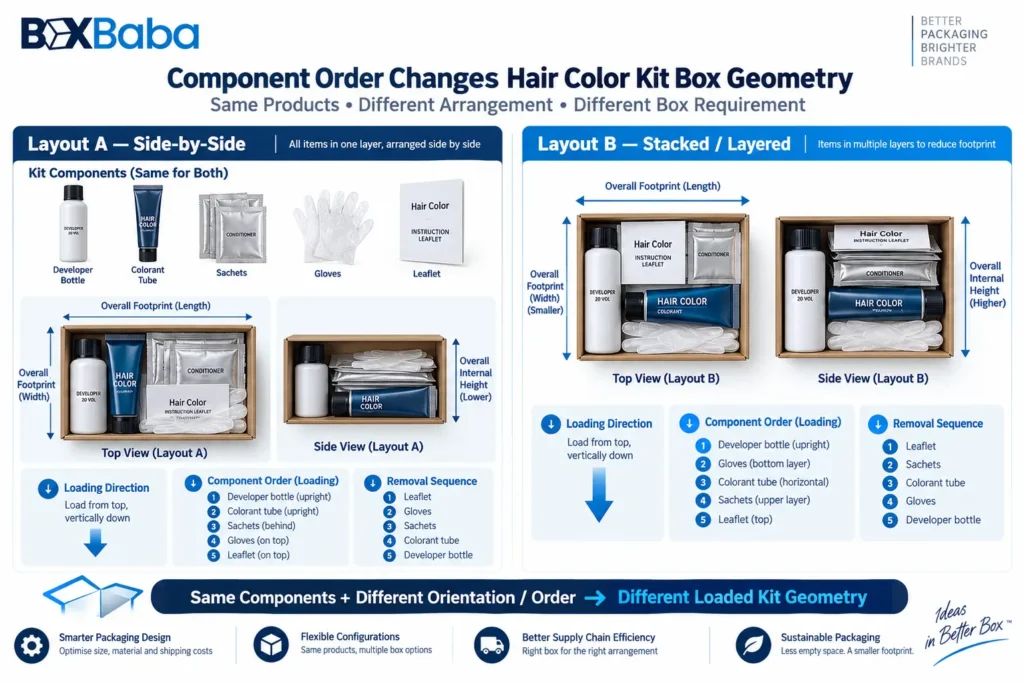
The same set of components can create different box shapes depending on arrangement. A tube and developer bottle placed side by side create a different footprint from the same products stacked or positioned in separate levels.
Component List + Orientation + Order -> Loaded Kit Geometry.
Confirm which item the customer should encounter first, whether a leaflet sits on top, whether gloves are tucked beside the developer, and whether treatments are grouped by application step.
Packing Sequence Matters for Assembly
A structurally valid layout should also be practical to pack repeatedly. Consider the sequence used during assembly: which component enters first, which items are loaded from the top, which are inserted from the side and whether one item blocks another.
A layout that requires excessive manipulation can create avoidable packing complexity even if the final dimensions appear correct.
Individual Component Dimensions Are Not the Box Dimensions
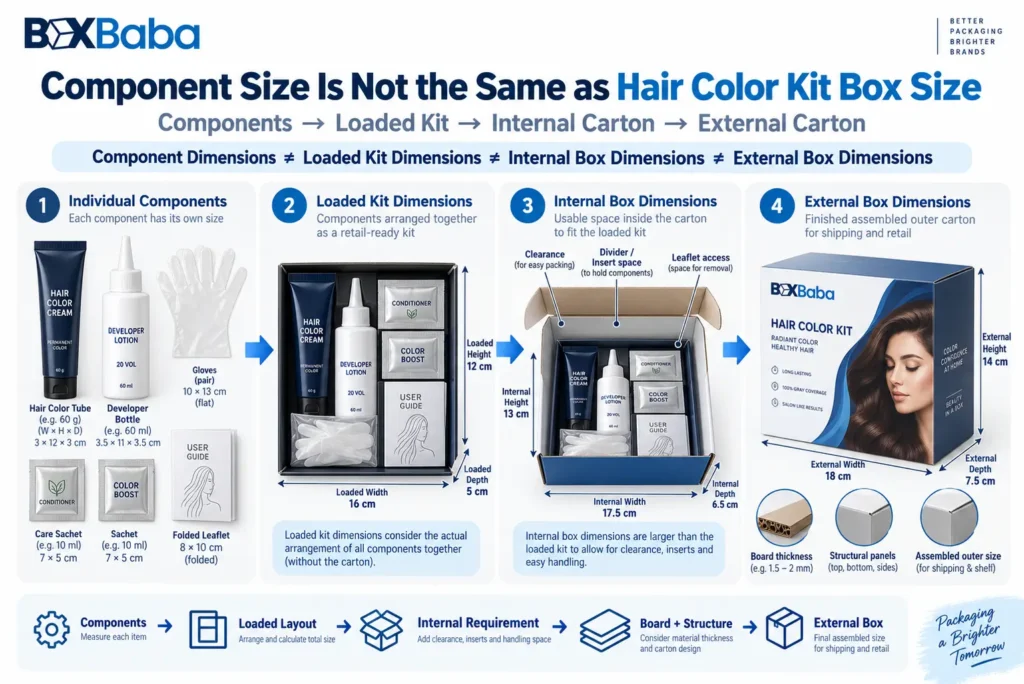
Hair color kits contain several dimensional layers. Each component has its own dimensions, the combined loaded arrangement has another set, the usable internal carton has another, and the finished outside package has another.
Component Dimensions != Loaded Kit Dimensions != Internal Box Dimensions != External Box Dimensions.
The loaded-kit layout becomes the starting entity for the secondary package. Internal dimensions may also need to account for structural clearance, a divider or insert, leaflet access and the selected loading direction.
Do Not Add One Universal Clearance
There is no fixed clearance value that should be added to every hair color kit. A lightweight single color tube, a tube-and-developer pair and a dense multi-step kit have different geometries and packing requirements.
Required internal space can depend on component variation, filled weight, carton board, opening style, packing direction, insert or divider geometry, leaflet thickness and product-removal access.
Provide actual component measurements first, then develop project-specific internal dimensions around the selected structure.
When Does a Hair Color Kit Need Dividers or Inserts?
A divider or insert should solve a defined internal packaging problem rather than being added automatically because the kit contains several products.
Possible functions include separating a developer bottle from a tube, creating a defined accessory zone, maintaining component order, establishing a platform, organizing multiple treatment steps or providing practical removal access.
Use: Required Internal Function -> Direct Fit / Integrated Structural Support / Separate Divider or Insert.
For the broader decision framework, see When Do Cosmetic Boxes Need Inserts?.
A Divider Should Not Press on Tube Crimps, Nozzles or Sachet Seals
Internal components should be reviewed against the actual contact areas of the finished products. Avoid designing support that relies on unnecessary concentrated pressure on tube crimps, bottle nozzles, sachet seals, labels or printed surfaces.
The maximum dimension and the preferred contact point are not always the same attribute.
Primary Containers Remain Responsible for Containing the Formula
The colorant tube, developer bottle, sachet and other formula receptacles are the primary containers. A paperboard secondary carton, divider or insert should not automatically be described as leak-proof, developer-resistant, oxidizer-resistant, stain-proof or direct-contact suitable.
Secondary Carton != Primary Formula Container.
The outer box can be planned around the finished primary containers, but it does not guarantee the performance of the formula receptacles, seals, crimps, caps, filling process or closure system.
Total Kit Weight Affects the Structural Review
Measure the completed weight of every filled component and the total retail-ready kit. A developer bottle, treatment packs and several accessories can make the assembled kit materially heavier than the main colorant tube suggests.
Total Kit Weight = Filled Components + Accessories + Printed Materials + Internal Packaging + Secondary Carton.
Loaded weight should be considered when selecting the carton structure, bottom closure and any internal support. It does not by itself dictate one universal board grade or insert material.
Single Color Tube vs Complete At-Home Dye Kit
An individual professional color tube can often be treated as a single-product secondary-carton problem. A complete at-home kit is a multi-component system.
Packaging Scenario | Primary Measurement Entity | Planning Focus |
|---|---|---|
Individual color tube | Finished filled tube | Tube geometry, crimp, cap, orientation |
Tube + developer | Completed two-component arrangement | Side-by-side vs stacked layout, combined weight |
At-home dye kit | Complete retail-ready kit | Components, accessories, instructions, opening sequence |
Root-touch-up kit | Complete narrow-accessory arrangement | Applicator position and compact layout |
Multi-step treatment | Ordered set of all steps | Sequence, separation and leaflet coordination |
Shade and SKU Planning
Hair color ranges often share one physical kit format across many shades. When the component list and geometry are compatible, one structural dieline may support several artwork versions.
Same Physical Kit Configuration -> Shared Structural Dieline -> Multiple Shade Artworks.
Prepare a shade / SKU schedule that links each artwork version to its component list, instructions, barcode and quantity.
- Product-line name
- Shade name and shade number
- Shade family
- Kit-component list
- Component dimensions and total kit weight
- SKU and barcode
- Artwork filename
- Quantity by shade
- Language / market version
- Instruction version
- Any structure, insert, window or finish difference
When Does a Shade Need a New Structural Review?
A different shade name alone does not normally require a new box structure. A new structural review is appropriate when the physical kit changes.
- Different developer bottle size or closure
- Different colorant tube size
- Additional or removed sachet
- Different applicator
- Extra gloves or accessory
- Different leaflet thickness or folded size that affects the internal layout
- Changed insert, divider or component order
- Different window or opening requirement
Artwork and Shade Communication Should Follow the Approved Structure
Finalize the structural dieline before completing artwork. The front panel, shade-identification area, barcode panel, instruction space, warnings and other buyer-approved information need to fit the actual carton panels and opening sequence.
Packaging artwork can organize buyer-approved shade and instruction content; it does not validate the hair-color result or regulatory sufficiency of the claims.
Retail Hair Color Packaging vs Ecommerce Shipping Packaging
The retail hair color kit carton and the ecommerce outer package are different packaging layers. The retail carton is developed around the complete finished kit. The outer shipping carton or mailer is developed around the completed order.
Retail: Finished Kit -> Retail Carton. Ecommerce: Completed Retail Carton(s) -> Outer Mailer / Shipping Carton.
For the broader channel distinction, see Retail vs Ecommerce Cosmetic Packaging.
Professional Salon Packaging and Consumer Kits Have Different Priorities
Professional salon systems may emphasize repeatable unit-carton dimensions, rapid shade identification and organized storage. Consumer at-home kits may place more emphasis on complete-kit presentation, instruction handling and accessory organization.
Do not assume that one layout should serve both contexts without reviewing the exact products, pack-out and channel requirements.
Hair Color Packaging and Hair Oil Packaging Should Stay Separate
Hair color kits are multi-component systems. Hair oil packaging usually begins with one finished bottle, dropper, pump or treatment container. The two subjects are related within beauty packaging but should not share the same primary search intent.
For single-bottle oil products, review Hair Oil Packaging Boxes.
Worked Example: Tube + Developer Hair Color Kit
Consider a hypothetical kit with a filled colorant tube measuring 6.10 in long x 1.75 in wide x 1.10 in maximum filled thickness, a developer bottle measuring 5.20 in high x 1.95 in maximum diameter, a glove pouch measuring 4.00 x 2.80 x 0.35 in, and a folded leaflet measuring 5.00 x 3.00 x 0.16 in.
These four sets of dimensions do not directly become the finished carton dimensions. The next task is to establish the final component order and loaded arrangement.
Component Measurements -> Chosen Arrangement -> Required Internal Support / Clearance -> Internal Carton -> Board + Structure -> External Dimensions.
Worked Example: Same Components, Different Arrangement
Using the same hypothetical components, one layout may place the tube and developer side by side with the leaflet on top. Another may position the developer vertically beside a folded tube section with gloves underneath. The component list is identical, but the footprint and internal height can differ.
Same Components + Different Orientation / Order -> Different Loaded Kit Geometry.
What If the Final Components Are Not Available Yet?
Use the most reliable approved references available and label the dimensions as preliminary. Suitable references can include supplier drawings, specification sheets or production-equivalent samples.
Then follow: Preliminary Component Dimensions -> Final Filled Components -> Complete Kit Pack-Out -> Measurement Confirmation -> Structural Approval.
If the developer, tube, sachet, applicator or leaflet changes before production, recheck the package.
Finished Box Dimensions vs Flat Dieline Dimensions
Finished box dimensions describe the assembled carton. A dieline is the flat production layout before cutting, creasing, folding and gluing. The complete-kit dimensions therefore do not equal the final flat dieline dimensions.
Complete Kit -> Internal Requirement -> Finished Carton Dimensions -> Structural Dieline -> Artwork.
Common Hair Color Kit Packaging Mistakes
Mistake | Why It Creates a Weak Specification | Better Direction |
|---|---|---|
Sizing the box from the colorant tube only | The developer, gloves, sachets and leaflet also occupy space | Measure the complete kit |
Using net contents as box dimensions | Volume does not define component geometry | Measure each finished container |
Measuring empty flexible tubes | Filled thickness can be larger | Measure filled and closed where possible |
Ignoring leaflet thickness | Instructions can materially affect the internal layout | Measure final folded leaflet |
Treating all shades as structurally identical | Some shades / variants may use different components | Maintain a physical kit + artwork schedule |
Adding an insert automatically | An insert may add cost and space without solving a real need | Define the required internal function first |
Pressing dividers against crimps or seals | Sensitive package areas may be poor contact points | Plan support around suitable contact areas |
Calling the carton leak-proof | The primary containers contain the formula | Keep primary / secondary roles separate |
Ignoring total kit weight | Bottom closure and structure depend on the loaded configuration | Record completed weight |
Finalizing artwork before structure | Panel dimensions and opening sequence may change | Approve dieline first |
Treating retail carton as ecommerce shipping package | They are different packaging layers | Plan the completed shipped order separately |
Hair Color Kit Packaging Quote Checklist
- Complete list of every formula container, accessory and printed item.
- Finished dimensions and filled weight of each colorant tube, developer bottle and treatment container.
- Sachet dimensions, count and combined stacked thickness.
- Glove format, pair count and folded / pouch dimensions.
- Applicator, brush, comb or nozzle dimensions.
- Final folded leaflet dimensions, thickness and language / market versions.
- Preferred component order and orientation.
- Total completed kit weight.
- Insert, divider, rail, platform or pocket requirement if known.
- Opening direction and intended removal sequence.
- Shade list, shade numbers, SKU / barcode and artwork filenames.
- Quantity by shade, language version and kit format.
- Preferred structure if already selected.
- Artwork status, sales channel and delivery destination.
This gives the packaging supplier a complete physical brief instead of a vague request such as, I need a box for a hair dye kit.
From Hair Color Components to the Final Box
- Complete Kit Inventory
- Finished Component Measurements
- Component Order + Orientation
- Leaflet / Accessory Layout
- Total Loaded Weight
- Direct Fit / Divider / Insert Decision
- Internal Carton Specification
- Material + Box Structure
- External Dimensions
- Structural Dieline
- Artwork by Shade / SKU
- Proof / Fit Confirmation
Brands ready to develop packaging around their actual colorant tubes, developer bottles, gloves, treatments and instructions can review BoxBaba Hair Color Packaging.
Frequently Asked Questions About Hair Color Kit Packaging
What is hair color kit packaging?
Hair color kit packaging is secondary packaging developed around the complete retail-ready dye system, which may include colorant, developer, treatments, gloves, applicators and instructions.
Is there a standard hair dye kit box size?
No. The box depends on the actual finished components, their arrangement, total loaded weight, internal support and selected structure.
What should be measured before sizing a hair color box?
Measure every filled and closed tube, bottle, sachet, glove pouch, applicator and folded leaflet, then confirm their final order and orientation.
Should I measure an empty hair color tube?
Use the finished filled tube where possible. An empty or flattened tube may not represent the final packed thickness, crimp or closure profile.
How do I measure a developer bottle?
Measure the complete capped height, maximum width and depth or diameter, shoulder, neck, cap or nozzle profile and base footprint.
Do instruction leaflets affect box size?
They can. The folded leaflet has physical width, height and thickness, and multi-language versions may require a different fold or more internal space.
Do all hair color kits need inserts or dividers?
No. Use an insert or divider only when the complete package needs a defined positioning, separation, organization or presentation function that the outer carton alone does not provide.
Can all hair color shades use one dieline?
They can when the physical kit configuration remains compatible. A new developer bottle, tube size, accessory, leaflet format or internal arrangement may require a new structural review.
Does the hair color carton need to be leak-proof?
The secondary paperboard carton should not automatically be described as leak-proof. The colorant tube, developer bottle and sachets remain the primary formula containers.
How should a hair color kit be planned for ecommerce?
Develop the retail carton around the complete kit, then evaluate the completed boxed order separately for the outer mailer or shipping carton.
Is hair color packaging the same as hair oil packaging?
No. Hair color packaging often involves multiple components and instructions, while hair oil packaging usually begins with one finished bottle or treatment container.
What information should be included in a shade/SKU schedule?
Include product line, shade name and number, component list, SKU, barcode, artwork filename, language version, instruction version and quantity for each physical kit configuration.
When should the artwork be finalized?
Finalize artwork after the structural dieline is approved so panel sizes, opening direction, barcode area, shade identification and instruction space match the actual carton.