
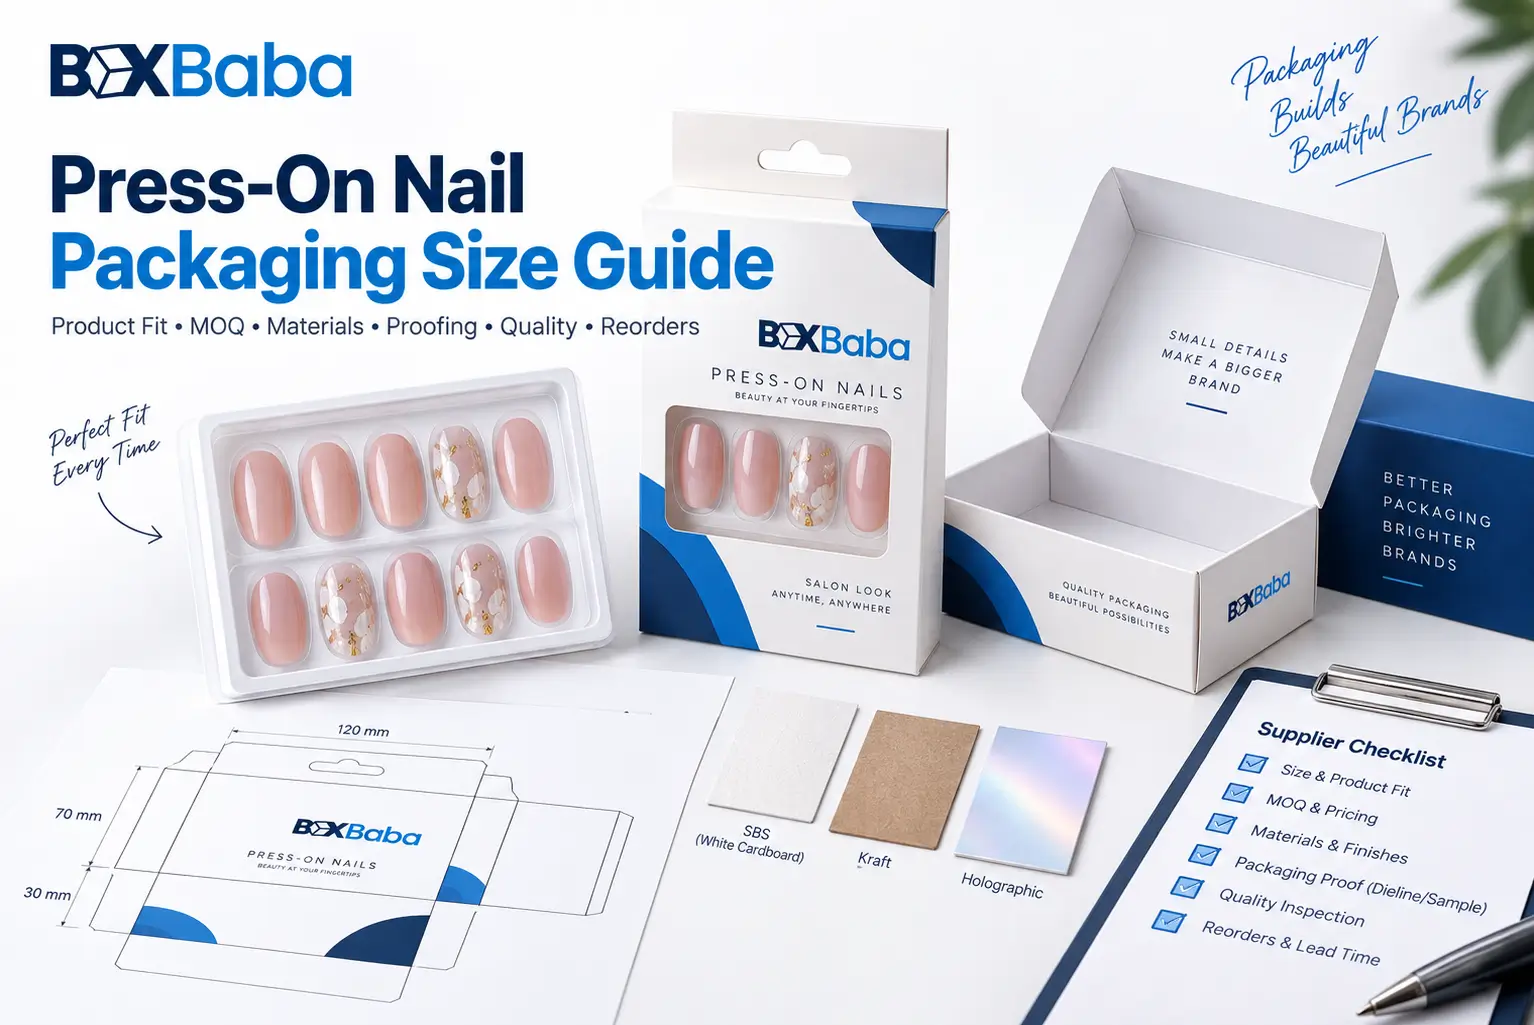
There is no universal production-ready press-on nail box size. Two sets can contain the same number of nails yet require different packaging because the tray dimensions, nail length, curvature, raised decorations, accessory layout and overall kit depth are different.
For press-on nails, the main measurement entity is usually the complete sale-ready tray or kit rather than one individual nail.
Use this sequence: Finished Nail Tray / Kit -> Maximum Tray Footprint -> Highest Finished Nail or Decoration Point -> Accessories -> Orientation -> Internal Support if Needed -> Internal Box Dimensions -> Material + Structure -> External Box Dimensions -> Dieline
Brands preparing a commercial project can review Custom Nail Packaging Boxes. For the broader measurement method used across cosmetic products, see the Cosmetic Box Size Guide.
Is There a Standard Press-On Nail Box Size?
No single size reliably fits all press-on nail sets. Published box-size suggestions can be useful for early planning, but nail count alone does not define the final package.
A 24-piece short square set, a 24-piece extra-long stiletto set and a 24-piece collection with gems or charms can all use different tray lengths, widths and depths.
The key relationship is: Nail Count != Tray Dimensions != Press-On Nail Box Dimensions.
Press-On Nail Packaging and Nail-Polish Packaging Are Different
Press-on nails are normally organized on a tray, card, holder or kit arrangement. Nail polish is a filled bottle with a cap, shoulders, base and liquid weight. Those are different measurement systems and should not share one sizing model.
Press-On Nails -> Tray / Kit Geometry -> Secondary Package. Nail Polish -> Finished Bottle Geometry -> Secondary Carton.
For filled nail-polish bottles, use the Nail Polish Box Size Guide instead.
What Should You Measure First?
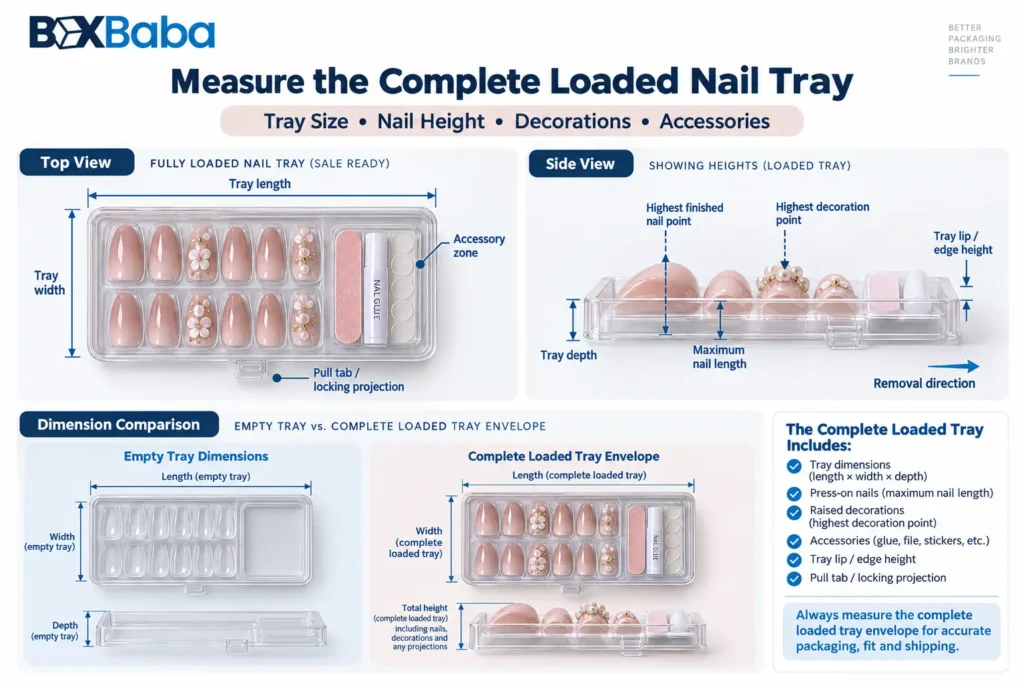
Measure the complete product exactly as it will be packed and sold. Position every nail in the final tray or holder. Add the accessories and printed materials that will remain inside the unit package before recording the maximum dimensions.
Do not measure only the tray base while ignoring tray lips, pull tabs, raised nail curvature, decorations, glue, files, prep pads, instruction cards or other parts that affect the finished layout.
Press-On Nail Tray Measurement Checklist
Measurement | What to Record |
|---|---|
Tray length | Maximum end-to-end finished tray dimension, including permanent tabs or projections |
Tray width | Maximum finished side-to-side dimension |
Tray depth / thickness | Tray structure before accounting for nails projecting above it |
Tray lip / edge height | Raised edge around the nail-holding area |
Pull tab / locking projection | Any feature extending beyond the main tray footprint |
Highest finished nail point | Greatest vertical point created by nail curvature or nail position |
Highest decoration | Gem, charm, texture, ornament or raised detail above the nail surface |
Maximum nail length | Useful when long nails approach tray or carton edges |
Maximum nail width | Useful for cavity spacing and tray layout |
Accessory dimensions | Glue, file, buffer, prep pad, tabs, instruction card or other packed items |
Completed unit weight | Tray + nails + accessories + printed materials + any primary containers |
Opening / removal direction | Lift, slide, drawer, top opening or another method |
Units per box | One tray, multiple trays, kit or collection |
Tray Length, Width and Depth Are Only the Starting Point
The outside tray footprint establishes the base plan of the package, but it does not always establish the full internal height. Nails can rise above the tray base, especially when they are long, strongly curved or mounted at an angle.
The package therefore needs two different depth concepts: tray depth and maximum loaded depth.
Maximum Loaded Depth = Tray Base / Edge Profile + Highest Positioned Nail or Decoration Point.
The finished internal requirement should be developed from the complete loaded tray, not from an empty tray alone.
The Highest Nail Point Can Control the Box Depth
For press-on nail packaging, the highest finished nail point is one of the most important measurements. It is the furthest vertical point reached after the nails are seated in their final positions.
A long curved nail can stand higher than a short flat nail even when both fit within the same tray footprint. This can change the required internal depth, lid clearance and window relationship.
Measure the tray while it is fully loaded. Record the highest point rather than estimating the package depth from nominal nail length.
Long, Curved and Extra-Long Nails Need Separate Review
Long, coffin, almond, stiletto and strongly curved nail sets can create different three-dimensional profiles. Nail length is useful, but curvature and mounting angle determine how far the nail projects above the tray.
Check maximum nail length, curvature, highest point, tray-edge height, distance to the lid or window and intended tray orientation.
A longer nail does not automatically require a larger box in every direction. It may primarily change the internal depth or the tray length depending on the arrangement.
Decorated Nails Can Change the Maximum Profile
Gems, charms, sculpted details, bows, crystals and other raised decoration can extend beyond the normal nail surface. Measure the finished decorated set rather than using the dimensions of an undecorated sample.
Record the highest decoration and any side projection that changes the tray or carton envelope.
A window, lid or internal component should not be positioned from an estimated flat-nail profile when the final product has raised decoration.
Nail Shape Does Not Equal Box Size
Nail Format | Primary Measurement Focus | Important Check |
|---|---|---|
Short square / round | Tray footprint + highest loaded point | Often relatively shallow, but the actual tray still controls |
Almond | Tray footprint + curved nail profile | Check mid-body height and tip position |
Coffin | Tray footprint + nail length + mounting angle | Longer sizes may affect tray length or depth |
Stiletto | Tray footprint + tip length + curvature | Tips may approach tray ends |
Extra-long / sculpted | Maximum loaded tray envelope | Do not infer from a standard-length tray |
Gemmed / charm-decorated | Highest decoration + side projection | Decoration may control clearance |
Primary Nail Tray vs Separate Box Insert
Many press-on nail products already use a molded plastic tray, paperboard holder or display card that positions the nails. That primary tray should not automatically be described as a separate secondary insert.
Primary Nail Tray / Holder -> positions the nail set as the sale-ready product. Separate Box Insert -> an additional structural component used inside the outer package when another positioning, separation or presentation function remains unresolved.
A separate insert may be unnecessary when the existing nail tray already positions the nails and fits the selected outer carton appropriately.
For the broader decision logic, see When Do Cosmetic Boxes Need Inserts?.
Accessories Must Be Measured as Separate Entities
A press-on nail kit may also contain adhesive tabs, a mini file, buffer, prep pad, cuticle stick, instruction card or liquid glue. These components can change both the tray arrangement and the finished package.
Measure each accessory independently before the final layout is established.
If liquid glue is included, measure the complete closed glue container as its own primary-packaging entity. Do not size an accessory cavity from the fill volume alone.
Accessory Layout Can Change the Box Without Changing the Nail Tray
Two brands can use the same nail tray but require different packages if one sells only the nail set while the other includes glue, a file, prep pads and instructions.
Same Nail Tray + Different Accessory Arrangement -> Potentially Different Internal Layout and Box Dimensions.
Confirm whether accessories sit beside, above, below or behind the nail tray and how the customer is expected to remove them.
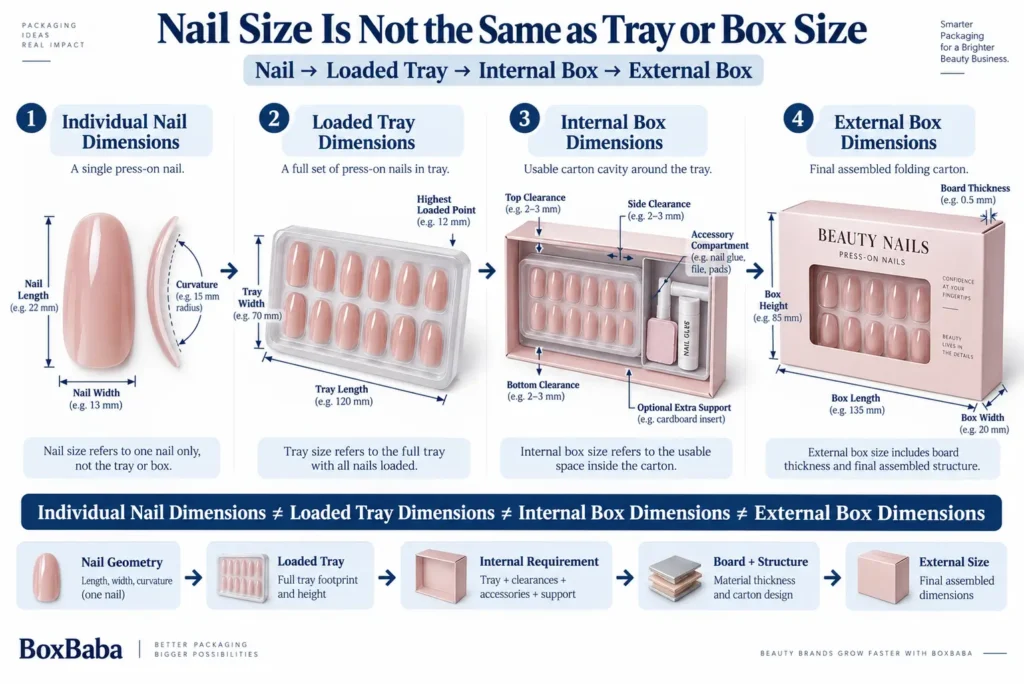
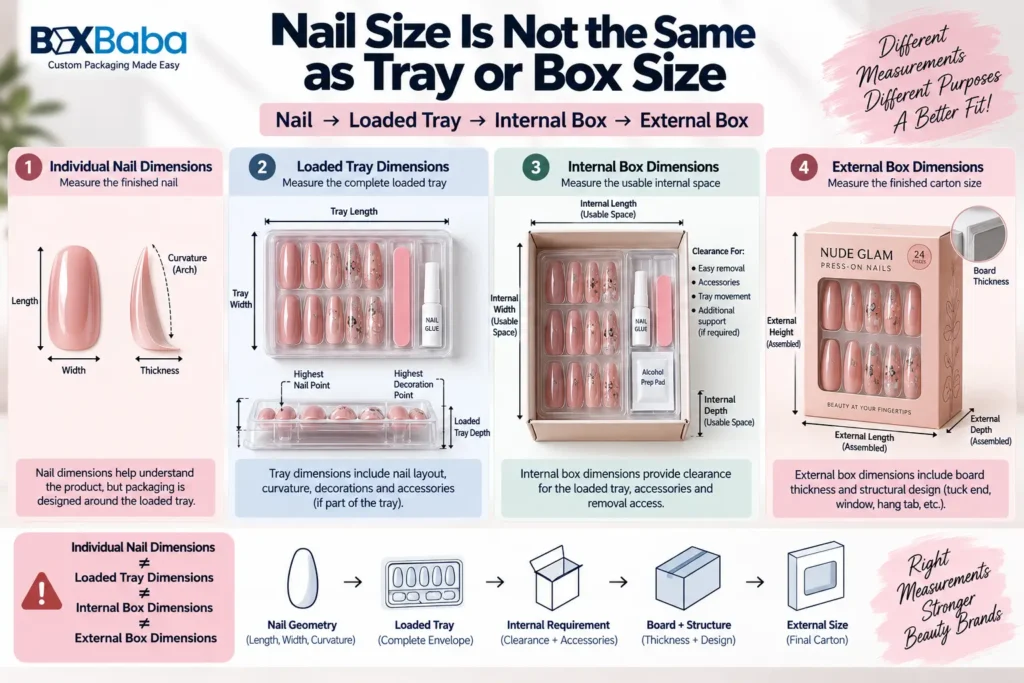
Nail Dimensions, Tray Dimensions, Internal Box and External Box Are Different
Press-on nail packaging contains several dimensional layers. Individual nails have dimensions. The loaded tray has dimensions. The usable internal box has dimensions. The finished outside carton has dimensions.
Individual Nail Dimensions != Loaded Tray Dimensions != Internal Box Dimensions != External Box Dimensions.
The loaded tray is usually the key starting entity for secondary packaging. Internal box dimensions may also account for clearance, removal, an additional insert or accessory compartment. The selected board and structure then affect the finished external dimensions.
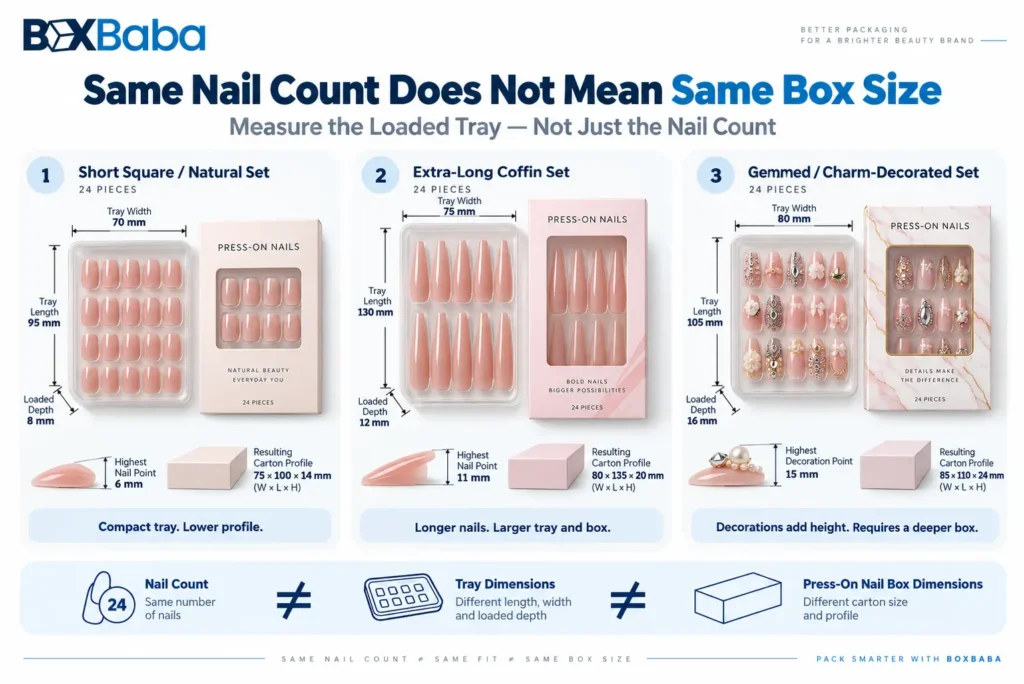
Do Not Add One Universal Clearance
There is no universal clearance number for every press-on nail package. A flat short-nail tray, a deep long-nail tray and a decorated set with charms can require different relationships between the loaded tray and the outer package.
Required internal space can depend on tray variation, highest nail point, decoration, loading direction, opening style, window, accessory layout, additional support and removal access.
Provide the actual loaded-tray dimensions first, then develop the internal specification around the chosen structure.
Removal Access Is Part of the Size Decision
A tray can fit dimensionally and still be difficult to remove. Confirm whether the tray should lift from the top, slide from one side, pull from a drawer or remain seated while the nails are accessed.
Finger notches, pull tabs, ribbons or open edges can require additional layout space. Removal access should be considered before the final dieline is approved.
How to Measure Window Press-On Nail Packaging
A window adds another alignment requirement because the visible area of the nails must be coordinated with tray position, artwork and remaining carton structure.
Confirm the visible nail area, tray orientation, highest nail point, window width and height, distance between the loaded nail surface and window plane, surrounding border, artwork safe zone and any required window film.
Do not place a window from an empty-tray drawing when raised nails or decorations change the finished profile.
Hang-Tab Packaging Requires a Completed Package Review
A hang tab is a retail-display feature, not a measurement shortcut. Confirm the complete packed weight, carton width, hanging direction, tray orientation, hole position, top-panel construction, barcode area and retailer requirements.
The hang-tab area should be developed after the unit package dimensions and loaded orientation are understood.
How to Size a Single Press-On Nail Tray Package
For a single tray, begin with the complete loaded tray rather than the individual nails. Measure tray length, width and depth; highest nail or decoration point; tabs or projections; accessories if packed within the same unit; and the intended removal direction.
The basic sequence is: Loaded Tray Envelope -> Clearance / Removal -> Internal Box -> Structure -> External Dimensions.
How to Size a Multi-Tray Nail Collection
A multi-tray collection should be developed from the completed arrangement rather than by multiplying the width of one tray.
Use: Every Tray Measurement -> Set Count -> Orientation -> Stacking / Side-by-Side Arrangement -> Spacing or Divider -> Removal Sequence -> Accessories -> Total Loaded Weight -> Internal Package.
Collection Variable | What to Confirm |
|---|---|
Number of trays | Exact trays per package |
Tray geometry | Confirm whether every SKU uses the same tray |
Highest point per tray | Long or decorated sets may differ |
Arrangement | Stacked, side-by-side, tiered or another layout |
Style order | Sequence if visual presentation matters |
Separation | Divider, platform, insert or open spacing |
Removal sequence | Which tray is accessed first and how |
Accessories | Glue, files, prep pads and instruction material |
Total loaded weight | All trays + accessories + internal packaging |
Can Different Nail Styles Use the Same Structural Dieline?
Yes, when the physical tray and loaded-product envelope remain compatible. Different colors, patterns, names, barcodes or artwork can share a structural dieline if the tray dimensions, highest nail point, accessories, orientation, window and internal support do not change.
Same Physical Tray + Compatible Loaded Height -> Shared Structural Dieline -> Multiple Artwork SKUs.
A new structural review is appropriate when a style moves to a different tray, changes from short to extra-long nails, adds raised decorations, includes new accessories or changes the presentation arrangement.
Nail Count Alone Does Not Determine the Package
The number of nails is useful merchandising information, but it is not a complete dimensional specification. A 12-piece set can be larger than a 24-piece set if the 12 nails are mounted farther apart, use a larger display card or include more accessories.
Nail Count + Tray Layout + Nail Geometry + Accessories -> Loaded Package Geometry.
Worked Example: Standard-Length Tray
Consider a hypothetical loaded tray measuring 4.60 in long x 2.70 in wide. The tray structure is 0.34 in deep, but the highest nail rises to 0.58 in above the tray base. A pull tab extends the overall tray length to 4.78 in.
The starting loaded-tray envelope is therefore 4.78 in L x 2.70 in W x 0.58 in maximum loaded depth.
These are not the final box dimensions. The package still needs the approved clearance, removal access, optional secondary support, board and structural design.
Worked Example: Decorated Long-Nail Set
Consider another hypothetical tray measuring 4.60 in x 2.70 in, but the longest nails and raised charms create a 0.92 in maximum loaded depth. The footprint is almost unchanged, yet the required internal depth is materially different.
Same Tray Footprint + Different Nail / Decoration Height -> Different Internal Depth Requirement.
This example illustrates why tray length and width alone are not enough.
Individual Nail Carton vs Cosmetic Retail Display
An individual press-on nail package is sized around one tray or kit. A multi-unit retail display is a separate packaging entity that must account for finished unit-carton dimensions, facings, rows, tiers, replenishment, header and retail footprint.
After the individual unit packaging is finalized, brands planning countertop or shelf merchandising can review Cosmetic Display Boxes.
Retail Nail Packaging vs Ecommerce Shipping Packaging
The retail package and the ecommerce outer package perform different functions. The retail unit is developed around the loaded nail tray or kit. The ecommerce package is developed around the completed order, which may contain one or several finished retail units.
Retail: Loaded Nail Tray / Kit -> Individual Retail Package. Ecommerce: Completed Retail Package(s) -> Outer Mailer / Shipping Carton.
For the broader channel framework, see Retail vs Ecommerce Cosmetic Packaging.
What If the Final Nail Tray Is Not Available Yet?
Use the most reliable approved reference available and label the dimensions as preliminary. This may be a tray supplier drawing, approved 3D model, production-equivalent sample or verified physical prototype.
Then follow: Preliminary Tray Geometry -> Final Loaded Tray -> Measurement Confirmation -> Structural Approval.
If the tray supplier changes the length, width, depth, tabs, cavity layout or material thickness, recheck the outer package before production.
Finished Box Dimensions vs Flat Dieline Dimensions
Finished box dimensions describe the assembled package. A dieline is the flat production layout before cutting, creasing, folding and gluing. The loaded nail tray dimensions are therefore not the same as the final dieline dimensions.
The process is: Loaded Tray Measurements -> Internal Requirement -> Finished Carton Dimensions -> Structural Dieline -> Artwork.
Common Press-On Nail Packaging Sizing Mistakes
Mistake | Why It Fails | Better Direction |
|---|---|---|
Choosing a box from nail count | 12, 20 or 24 nails do not define tray geometry | Measure the loaded tray |
Measuring only the empty tray | Nails and decorations may increase depth | Measure the final loaded tray |
Ignoring the highest nail point | Long or curved nails may control internal depth | Record maximum loaded height |
Ignoring raised decoration | Gems or charms can project farther than the nail | Measure the finished decorated set |
Treating nail length as box depth | Curvature and mounting angle matter | Measure the actual loaded profile |
Calling the primary nail tray an insert automatically | Primary holder and secondary insert are different entities | Define the role of each component |
Adding universal clearance | Internal requirements vary by tray and structure | Develop project-specific clearance |
Ignoring accessory geometry | Glue, files and cards can change layout | Measure every packed item |
Multiplying one tray width for a set | Spacing, stacking and removal also matter | Plan the completed arrangement |
Designing the window before loaded-tray confirmation | Nail / decoration height can affect alignment | Confirm geometry first |
Treating the retail box as the shipping package | Different packaging layer | Plan the completed ecommerce order separately |
Finalizing artwork before the dieline | Panel, window and hang-tab positions can change | Approve structure first |
Press-On Nail Packaging Measurement and Quote Checklist
- Nail-set type and nail count.
- Complete loaded tray length, width and maximum depth.
- Tray-edge height, tabs, lips and projections.
- Highest finished nail point.
- Maximum raised decoration or charm projection.
- Nail shape, length range and curvature where relevant.
- Complete accessory list with dimensions for each item.
- Liquid-glue bottle dimensions if included.
- Instruction-card or printed-material dimensions.
- Completed unit weight.
- Preferred tray orientation and removal direction.
- Window or hang-tab requirement if known.
- Separate insert, divider or accessory cavity requirement if known.
- Units or trays per package.
- Number of nail styles / artwork SKUs and quantity per SKU.
- Preferred structure if known.
- Artwork status, sales channel and delivery destination.
This provides a stronger packaging specification than saying only, I need a box for 24 press-on nails.
From Loaded Nail Tray to Final Box
- Complete Sale-Ready Nail Tray / Kit
- Maximum Tray Footprint
- Highest Nail / Decoration Point
- Accessories + Loaded Weight
- Orientation + Removal Direction
- Direct Fit / Additional Support Decision
- Internal Carton Specification
- Material + Box Structure
- External Dimensions
- Structural Dieline
- Artwork
- Proof / Fit Confirmation
Brands ready to develop packaging around their actual nail trays, accessory kits or multi-set collections can review BoxBaba Custom Nail Packaging Boxes.
Frequently Asked Questions About Press-On Nail Packaging Sizes
What is the standard press-on nail box size?
There is no universal production-ready size. The correct package depends on the complete loaded tray or kit, highest nail or decoration point, accessories, orientation and selected box structure.
Does 24 nails determine the box size?
No. Nail count does not define tray length, width, depth, nail curvature, decoration height or accessory layout.
What should I measure for press-on nail packaging?
Measure the complete loaded tray or kit: tray length, width and depth, tabs or projections, highest finished nail or decoration point, accessories, completed weight and intended orientation.
Should I measure the empty tray or the loaded tray?
Measure the final loaded tray. An empty tray can understate the required depth when nails, curvature or raised decorations project above the tray.
What is the highest nail point?
It is the greatest vertical point reached by any finished nail after it is positioned in the final tray. It can control the internal depth of the package.
Do gems and charms affect the box dimensions?
They can. Measure the highest and widest finished decoration where it changes the loaded-tray profile.
Are individual nail dimensions the same as tray dimensions?
No. Individual nails have their own dimensions, but the secondary package is normally developed around the complete loaded tray or kit.
Is the nail tray the same as a box insert?
Not necessarily. The primary tray may already be part of the sale-ready nail product. A separate secondary insert is an additional structural component used only when another internal function remains unresolved.
How do accessories affect press-on nail box size?
Glue, files, prep pads, instruction cards and other accessories create additional dimensional entities and can change the internal arrangement even when the nail tray itself stays the same.
Can different nail styles use the same box dieline?
Yes, when the tray dimensions, highest loaded point, accessory layout, orientation and internal structure remain compatible. Artwork changes alone do not necessarily require a new structural dieline.
Do long press-on nails always need a larger box?
Not necessarily in every dimension. Long or curved nails may increase tray length, internal depth or both depending on how they are mounted. Measure the actual loaded tray.
How do I size a multi-tray press-on nail set?
Measure each loaded tray, then establish the set count, arrangement, stacking or spacing, removal sequence, accessories and total loaded weight before developing the internal box dimensions.
Should a press-on nail window box be sized from the window first?
No. Confirm the loaded-tray geometry and nail / decoration height first, then position the window around the approved product orientation and carton structure.
Is press-on nail packaging the same as nail-polish packaging?
No. Press-on nail packaging is generally tray- or kit-based, while nail-polish packaging is developed around a filled bottle, cap, shoulders, base and bottle weight.
Can I use online standard press-on nail box dimensions for production?
Use them only as rough planning references. Production dimensions should be developed from the actual loaded tray or an approved dimensional reference.